My own constructions
Chastity shorts
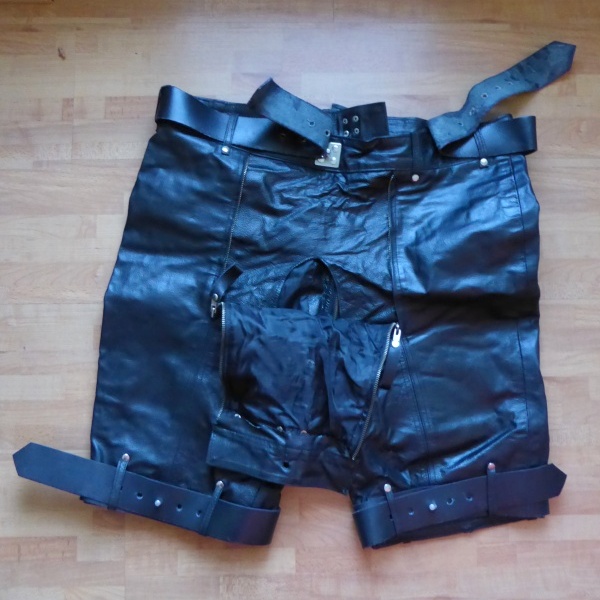
I've been thinking for years on how my favorite locking overalls would look like. One possibility I worked out is based on the locking chastity pants or shorts that are available from a number of bondage and fetish stores, and you can always find them on eBay too.For those who are not familiar with these shorts or pants, let me show you their details:

|
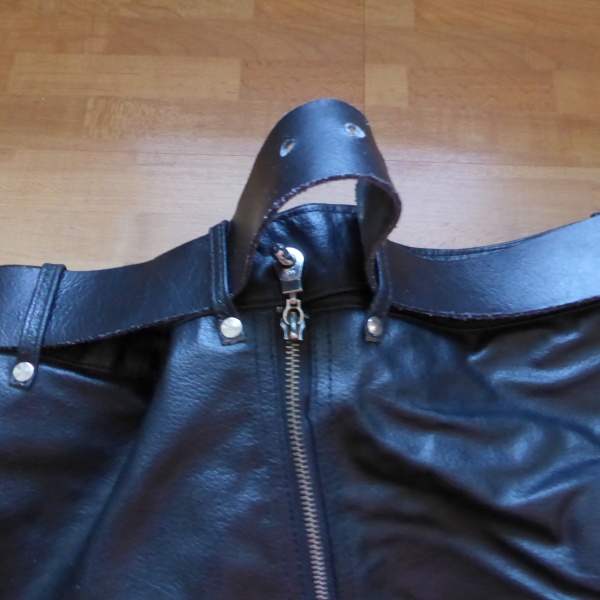
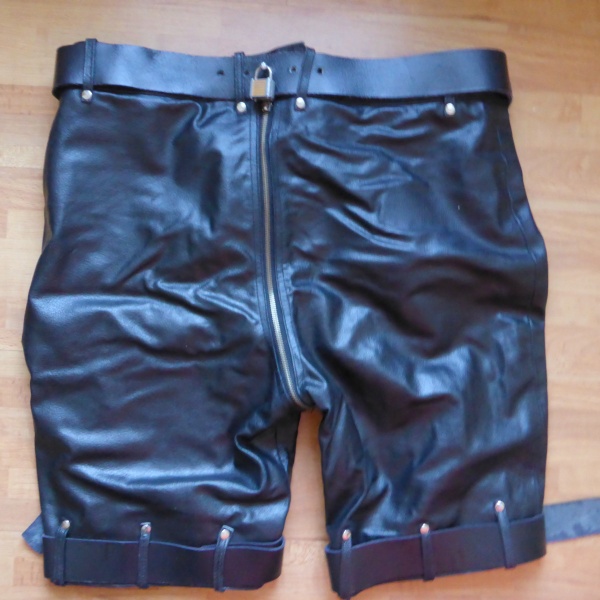
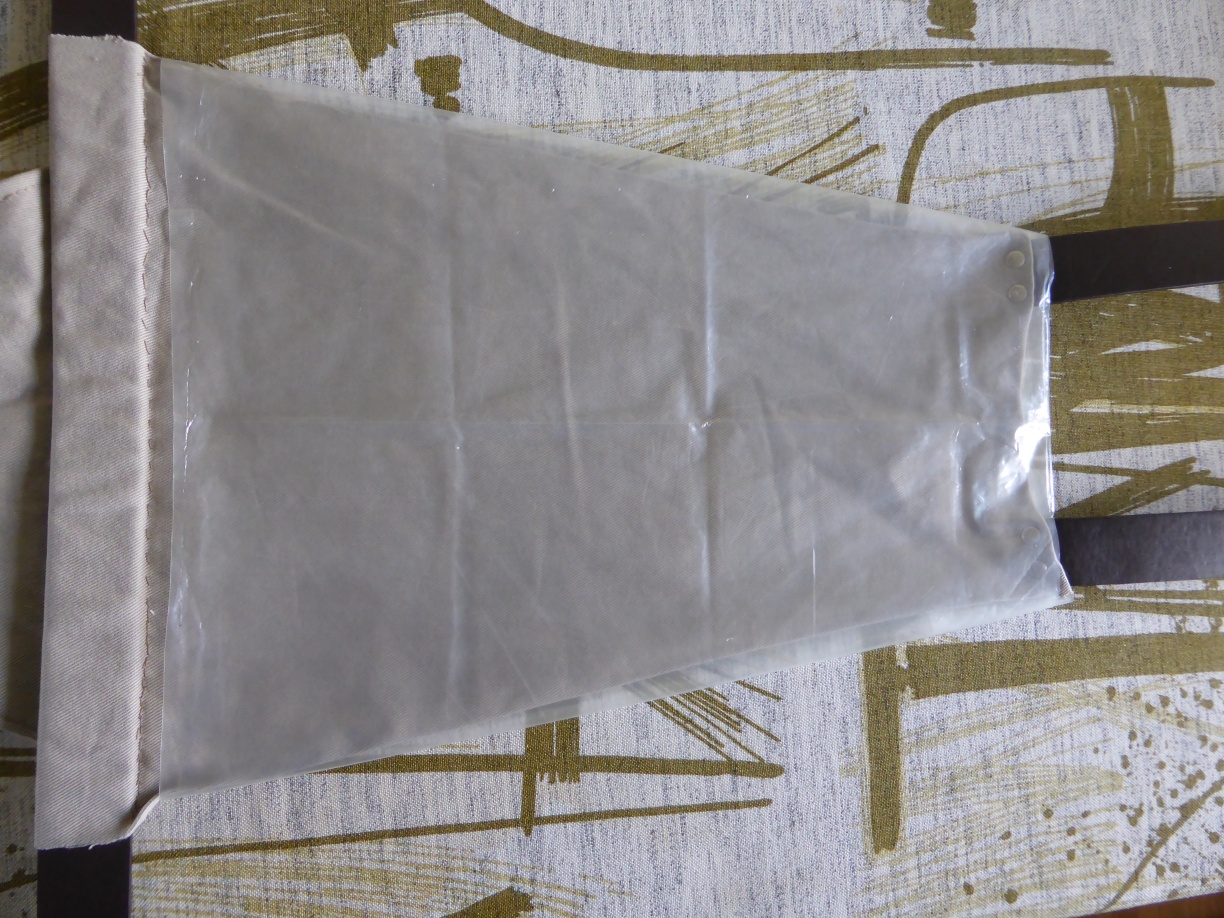
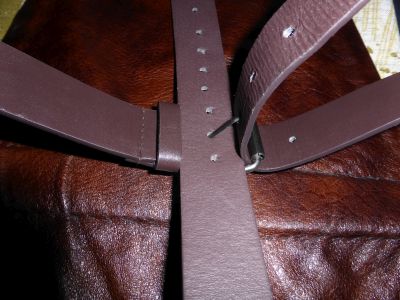
These shorts are made of leather, and have lockable straps for the waist and around the thighs to prevent access from all directions. The straps have holes that are pulled over a metal post with a hole in it that can accept a padlock, thus preventing the straps from opening. The shorts have a separate compartment for the member, which is put through the hole. |

|
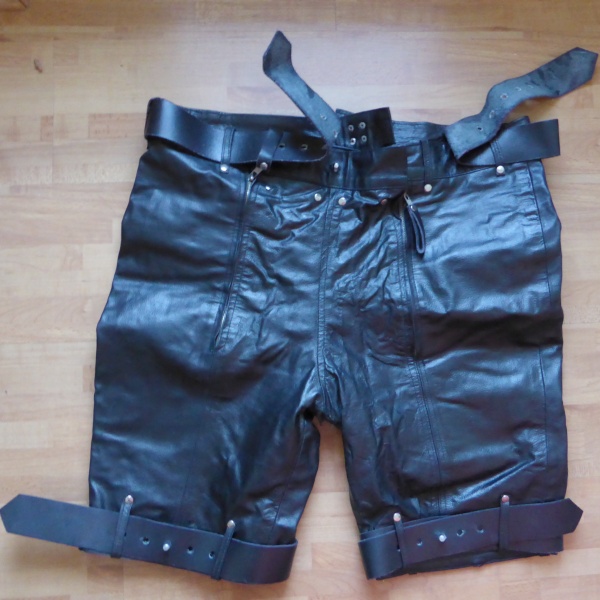
The two front zippers, comparable to German Lederhosen, pull up. The have a leather loop attached to the zipper pull and the waist band is threaded through those. That way once the waist band is locked, the zippers can't be pulled down anymore. |

|
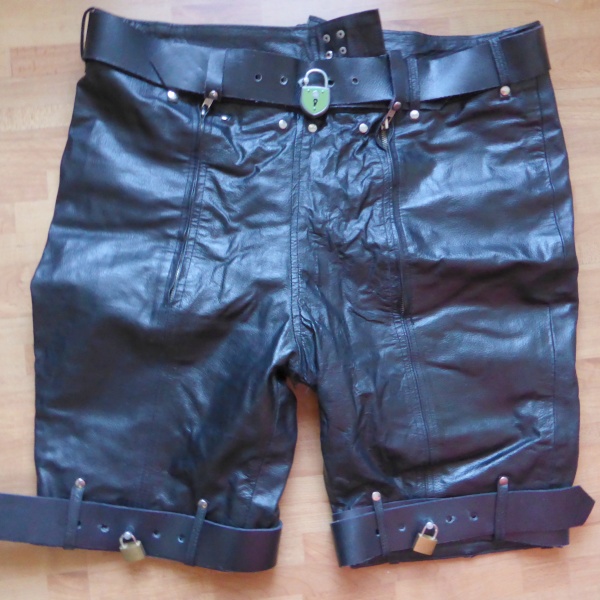
Pull the straps tight and over the locking posts. Add padlocks to secure them. |

|
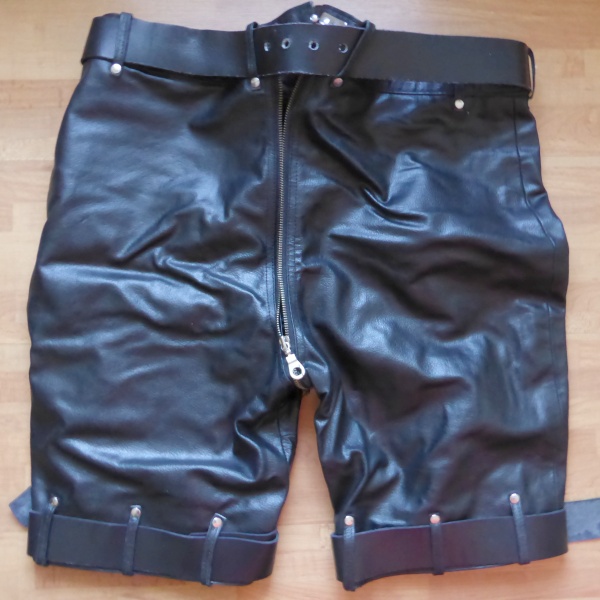
The shorts close in the back with a zipper and a further locking post. |

|
The zipper pull will also fit over the locking post, preventing it from being pulled down once a lock is added. |

|
When at the front the waist strap is pulled closed, one of the holes at the back should also be aligned with the locking post there. Add one more padlock and it is secure.
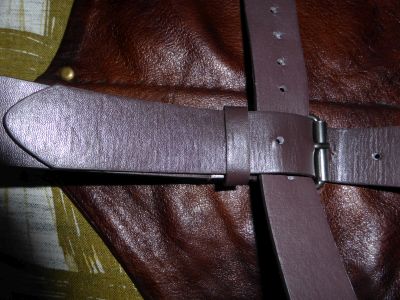
Note that the waist strap can also be worn opening at the back. With the opening in front though, the keyholder can decide to open the chastity flap without letting the wearer out completely. |
My design
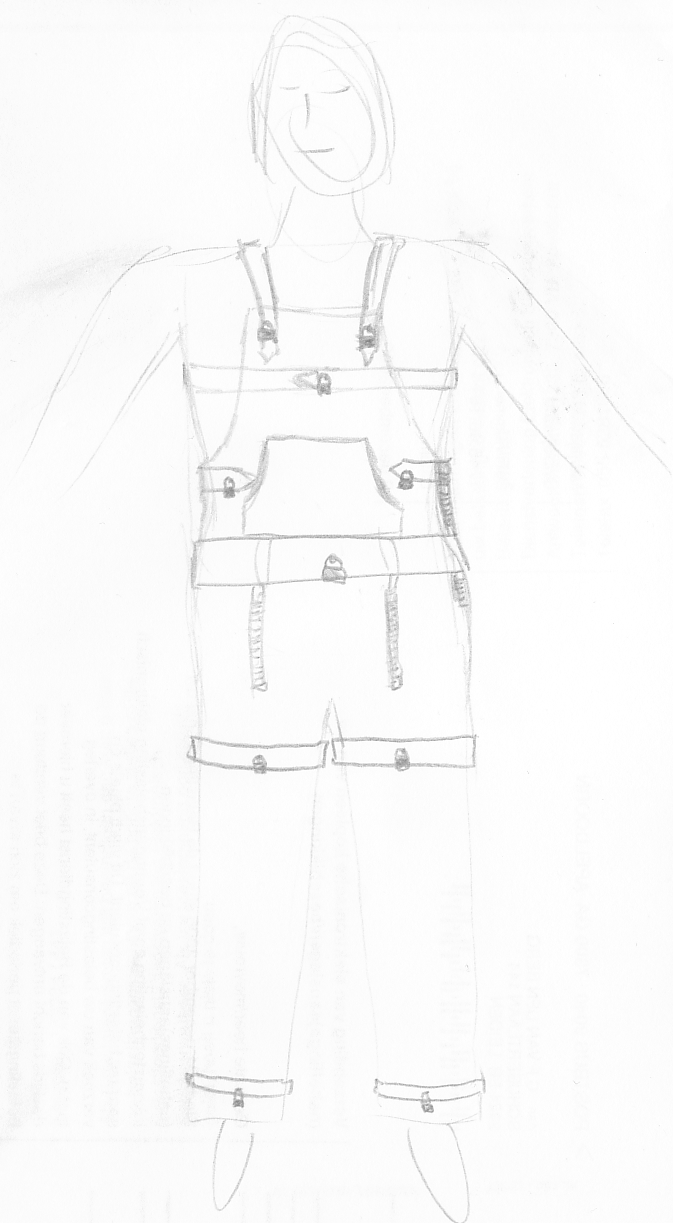
My thoughts are using these for the bottom part of my favorite overalls, and add a top part based on the same straps and locking posts:

|
Instead of a zipper up the back, these overalls close with a zipper on the left side that has a leather loop on the zipper pull, so that the left side strap can be threaded through. There is a strap on the right side too, to regulate the tightness around the waist.
The legs contain straps around the thighs and the ankles. If these are removed, and the top part covered, these overalls look almost like normal leather pants. It might be even better if these were straps with locking buckles, so that when removed there is no metal post sticking out. The bib contains a kangaroo pouch, partly because it is a comfortable place to put your hands, but also because the hands could be chained or cuffed inside, which won't be visible on the outside. There is an extra strap below the armpits for extra safety. The back and front bib are high enough that the straps can't be pulled over the shoulders, and of course they lock again with the metal posts. |
Since I'm still considering this design, and have not found a place that will make these for an acceptable price, they are still only on the drawing board. If you have any suggestions about them, please mail me.
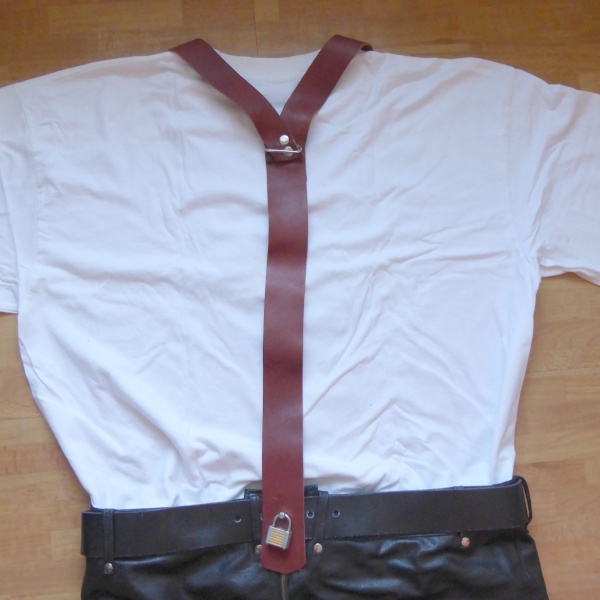
Shoulder straps
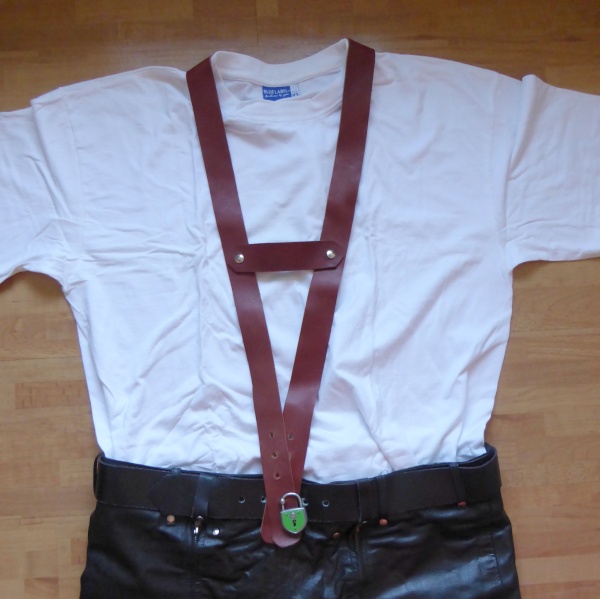
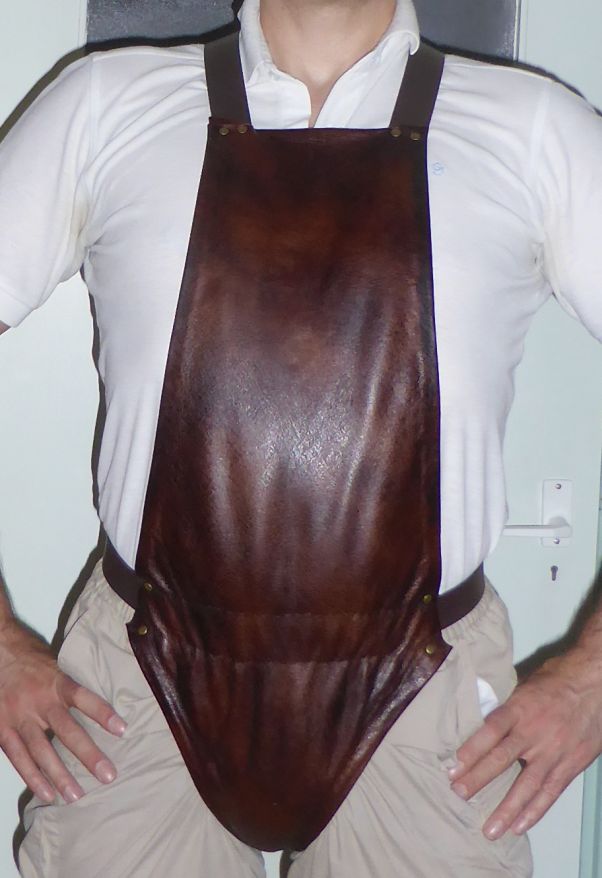
In the mean time, I have created shoulder straps for my chastity shorts that lock onto the waist posts:

|
At the front, the straps have a crossbar to prevent them from being pulled over the shoulders. A bit like Lederhosen straps, but without buckles on the straps. The strap length can be varied by using one of the several holes at the end of the straps. |

|
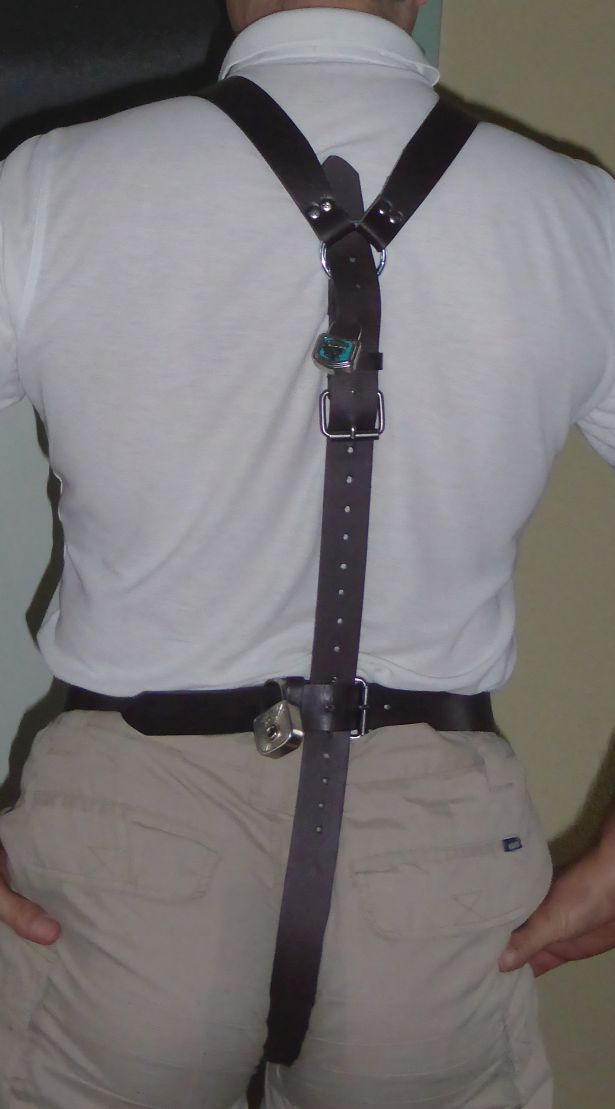
At the back, there is a metal ring where the straps split, which can serve as an attachment point for e.g. a leash. |
Harness Shortalls
At one of the interesting discussions at MisterPoll about Shortalls, a contributor named Tradboy described punishment shortalls his aunt had made him wear in his teens. The straps connected at the back to prevent him from undoing them, but when after much fiddling he managed to loosen them anyhow, she added a padlock. Unluckily he has since then canceled his account and his messages have disappeared.To me this sounded quite interesting, not only to hear from an actual case where locking shortalls were used in 'real life', but also because the construction appeared to be easy to make and quite adjustable. So I decided to make a version of them myself - not to try to make an exact reconstruction of those, but to use the ideas in a version of my own.
In case other people are interested in making something similar, or just curious about the process, I'll describe here how I made them.
Design
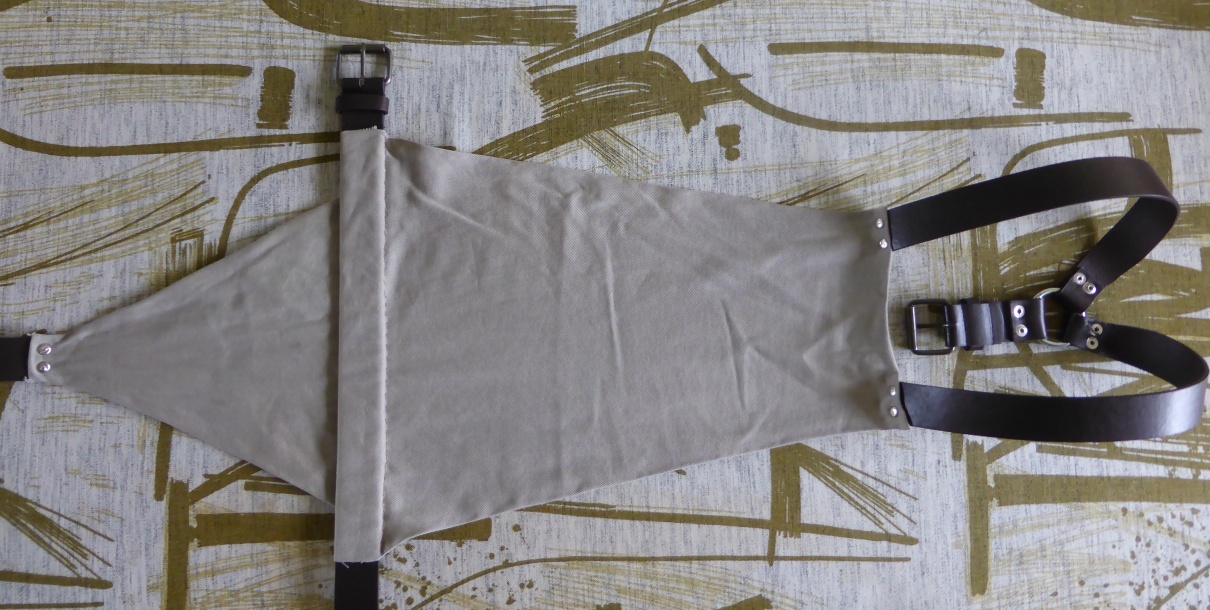
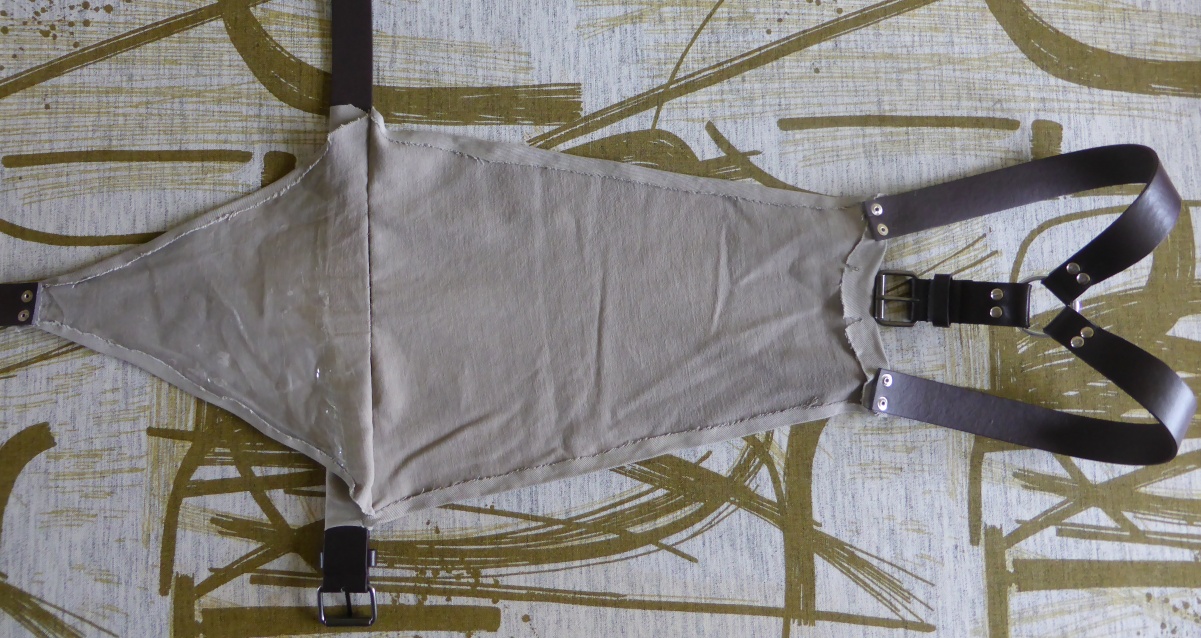
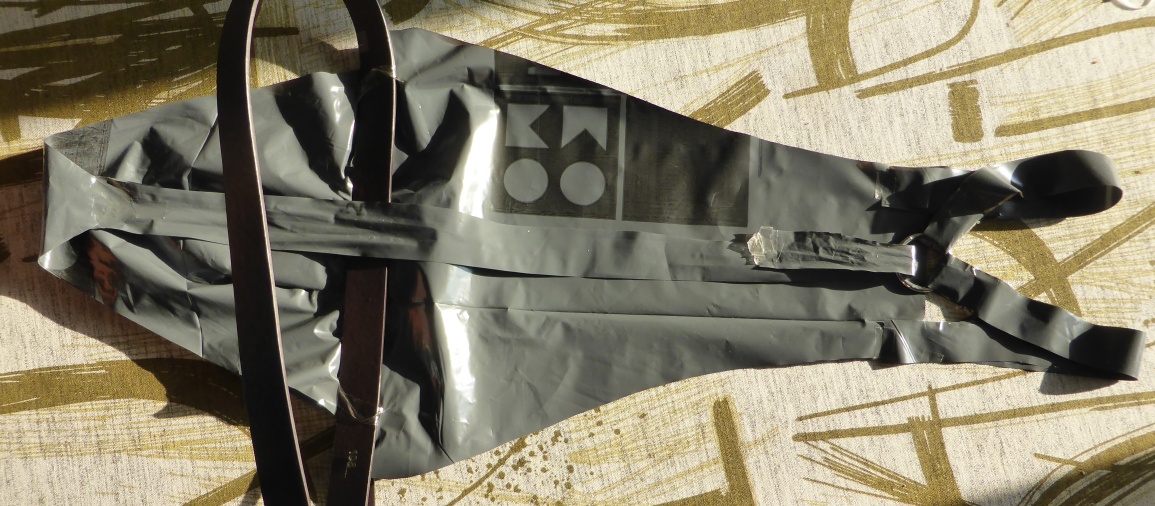
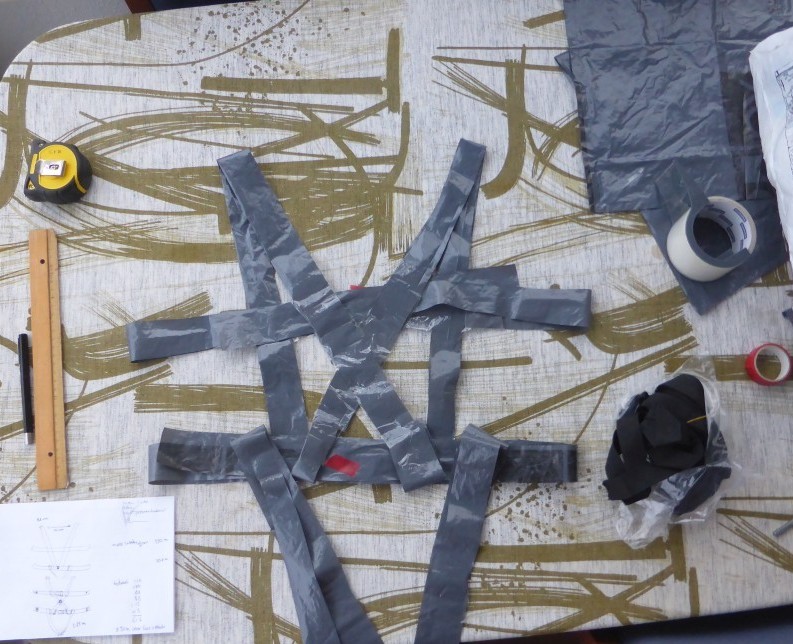
I started off by trying to draw how I would imagine from the description that the shortalls might have looked. (The description is not clear in all details: it was probably over 40 years ago that they were worn.) Then I drew a second set of sketches on how I wanted to make my version.Next I cut a bib and pouch from an old newspaper to get an idea about the right dimensions, and then I did the same from a garbage bag (double layer for more strength), but this time including the straps. Then I taped the pieces together, actually using one belt and the metal ring. These were actually wearable, with the back strap run through the ring and taped 'on the way back', though of course not very inescapable yet. This version still had a separate bib and pouch piece, and I had added 2 folds on the top of the pouch to make it somewhat hollow. For the final version I decided to make it out of 1 piece of fabric, for strength and easier construction.
Notes:
- For a long time I deliberated if I wanted to connect the waist and back straps where they cross, but any useful construction I could think of made them less adjustable to different waist sizes. So I postponed that decision, and in the end decided there was no real reason to add it, especially when the back strap is under the waist belt.
- I was also considering adding a chastity function, and experimented with incorporated wires on the sides of the pouch, and with a sports protective cup, but I didn't succeed in preventing access adequately, so I left that out in the end.
Construction
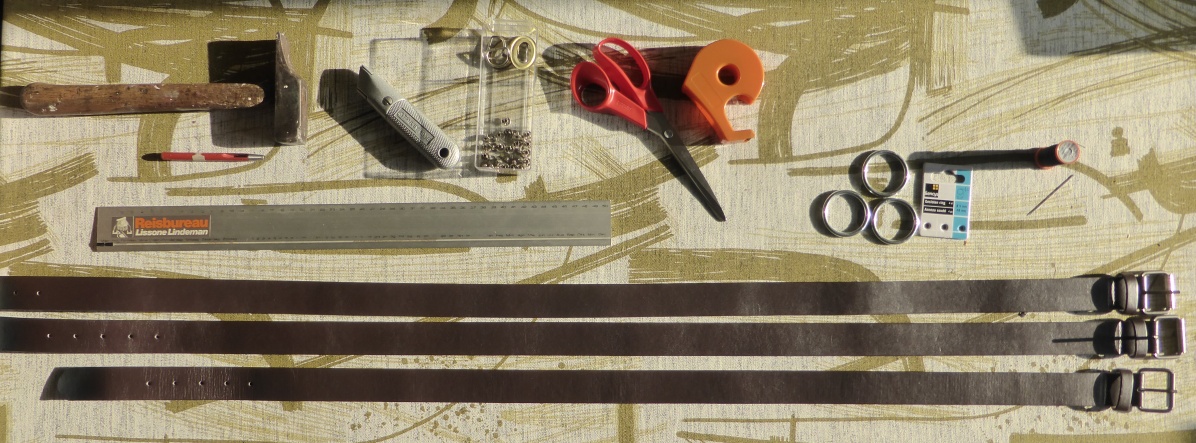
Then I felt I was finally ready to start the actual construction. Below I will mention the sizes I used, but of course they are optimized for my size (1.82m, 90kg), so others might need to tweak those to their measurements.The materials I used:
- 3 men's belts (1,99 each at 'Action' - a sort of dump store)
- 1 metal ring (4.8 cm diameter, 4 for 2,69)
- 12 rivets
- fabric from old pants (70x40 cm)
- thread
- fabric glue
- a piece of plastic (triangle somewhat smaller than the crotch piece - 40x25 cm will do)
- scotch tape (mostly for the garbage bag version)
All in all I spent less than 10 euro total.
The tools I used:
- knife
- scissors
- pliers (for the rivets)
- hole puncher
- needle and (safety) pins
- ruler (50 cm, for guiding the knife)
- tape measure

The measurements (for my size) in centimeters:
- bib: height 40; width at top: 16, at bottom 40
- crotch piece: height 25; width at top: 40, at bottom 3
- waist belt: your waist + at least 10 cm; mine: 105 cm
- shoulder straps: 42 (of which 4 overlap)
- buckle: as short as possible; mine 12 (of which 3 overlap)
- crotch/back strap: 78 cm (of which 1 overlap) - could have been 10 cm shorter
For attaching to the metal ring, I used 3cm extra belt length; perhaps slightly less is possible, but it soon gets fiddly to try to bend a stiff belt around the ring, put the rivet parts in, and squeeze them together. For attaching to the fabric I used 1cm extra belt length, and folded the fabric double for extra strength. (I added the seams later.)
Notes:
- I constructed the back with the buckle hanging down from the ring for greater adjustability: if the buckle were on the back strap and the end coming down from the ring, you'd only have that short end to make it looser / tighter, or adjust it for someone else (e.g. at another photo shoot). And if you make the end long, the buckle will be lower on the back, and thus easier to reach. Having the buckle at the lower end would make it harder for the wearer to operate the buckle though, since you'd need to pull the end upward to tighten/loosen it. I made sketches of 4 different solutions for the back, and this seemed best, but it still is not perfect.
- I used 3cm wide leather mens belts. If you want the shortalls to be more noticeable (= less comfortable), you can use smaller (womens) belts. At the attachment points you should probably use two rivets along the belt for sturdiness (since two next to each other won't fit).
- I added plastic lining to the pouch, both because the description mentioned them, and make it easier to clean them when wearing directly on the skin: with the leather straps I'm not going to put them in the washing machine.
- I incorporated too much extra for the seams in the fabric, so I decided to fold the material to make a tunnel for the waist belt. If the fabric had been the correct size, I would either have just used rivets to connect the belt to the fabric, or added a loose piece of fabric at the back to create the tunnel. But in the end this solution works fine.
- I don't have a sewing machine, and in principle these can be constructed without any sewing: the waist belt can be riveted to the fabric, and the seams can be glued with fabric glue.
- The fabric glue doesn't work very well in attaching the plastic lining to the pouch, so in the end I used sewing along the seams, and in the center, to keep it in place better.
- The metal ring at the back was slightly smaller than I would have wished, and to make the shoulder straps leave at a suitable angle, I tapered them at the end.
The Result
The end result, worn on top of my Zentai suit for decency and anonymity, with a leash attached to the metal ring: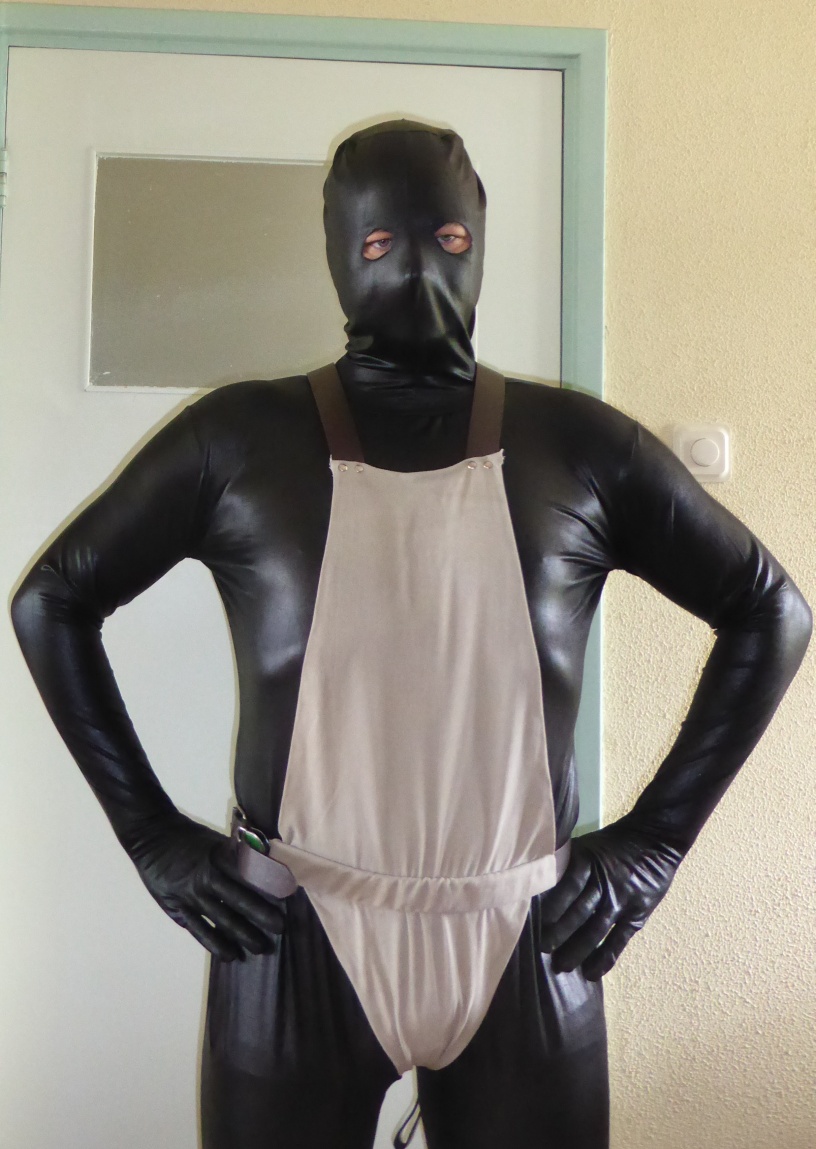
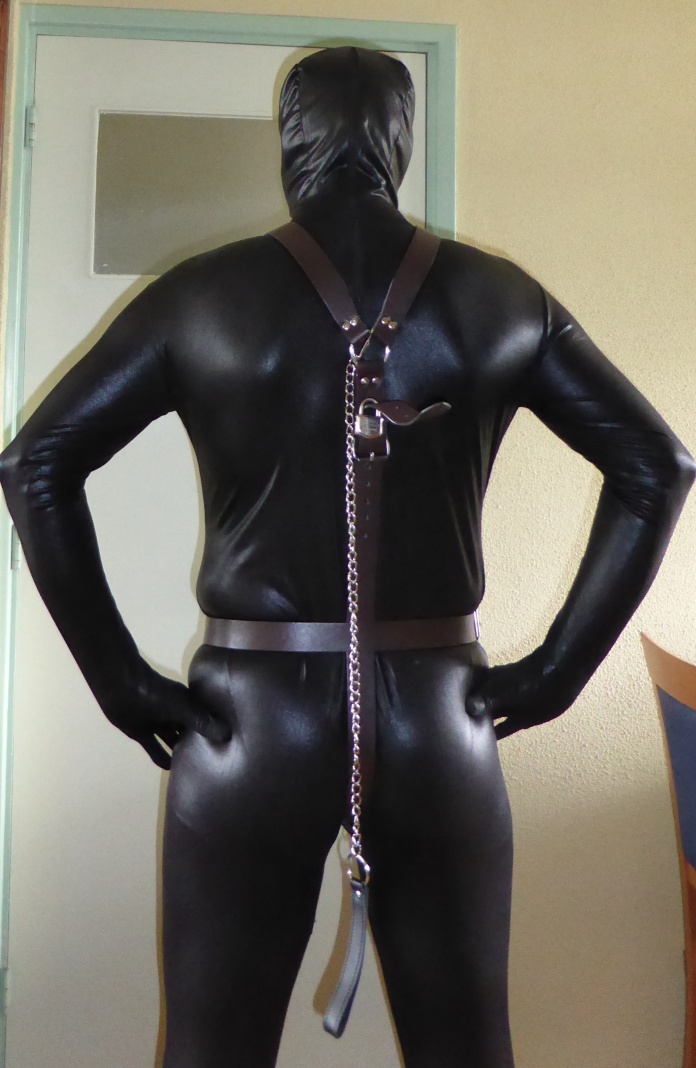
You can actually weave the end of the back strap through the metal ring for a cleaner look, but with the suit on and the straps pulled on tight, I didn't manage that for this picture. Looking at the picture I realize why: the hook from the leash was in the way.
Notes:
- All in all I spent some 6 hours working on them, plus a number of hours figuring out all the little details, like deciding to make the top of the bib slightly rounded, so that when someone a smaller than me wears them, there is a better chance they still will fit.
- When the leash is attached to the ring, I can't get it off: the ring is at the spot that is hardest to reach. I can touch it but not operate the snap hook. But since the buckle is about 10cm lower, I can operate it without too much trouble, and even add/remove a padlock on the end. It should be possible to shave a centimeter or 2 off the buckle strap length, but not much more.
- It is fairly comfortable to wear, even on the bare skin, though the belts start sticking a bit, but the belt through the but crack is wide enough to not irritate much. The buckle at the back is uncomfortable though when leaning back against a chair rest or couch. And a padlock doesn't help either.
Accessories
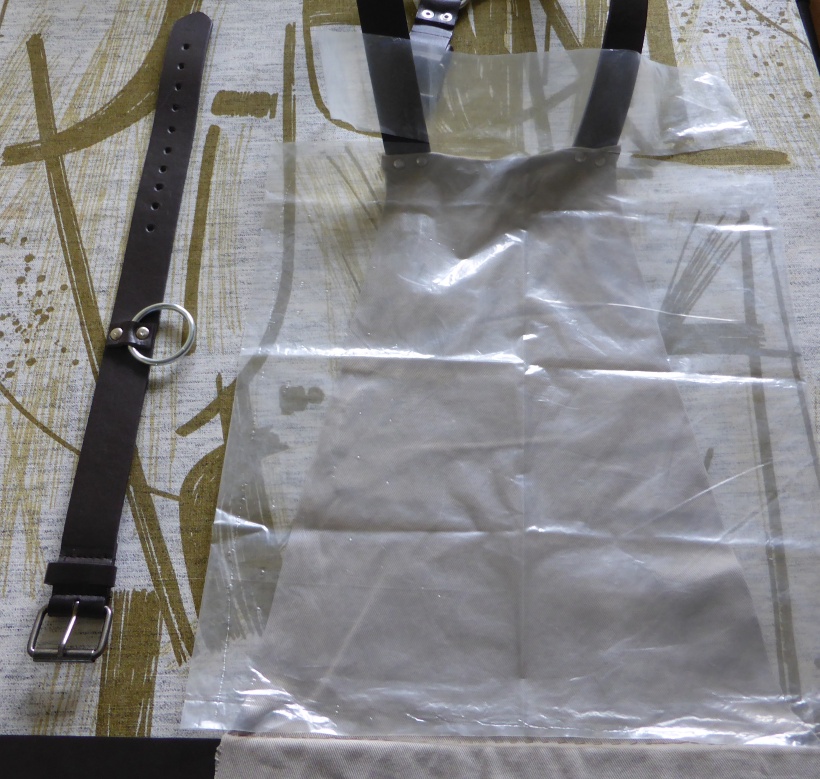
Since I had half a belt with buckle left, and several metal rings, I decided to make a matching collar: just use an existing belt end to cut a tapered end, punch some holes, add a small strip of leather with 2 rivets for the ring.To keep the bib clean when for example eating messy stuff, I added a plastic cover for the bib, by taking a piece of plastic and cutting incisions near the top, so that the part still connected was the size of the top of the bib, inside the straps. Now you can fold to top flaps under de straps, then fold the whole top part down. That way the plastic will stay up. You can choose to leave the sides sticking out, or fold them around the bib sides, like in the second picture.
Faux Leather version
Like I planned originally, I went looking for some leather-like material, and found something that is not the 'normal' pleather for clothing, but it has a leather-like surface on a nylon-like fuzzy fabric. There was not too much choice in colors, so I settled for brown. I am actually quite pleased with the material: it is waterproof, and very strong: I made a small hole, put a large nail through, and tried to tear the nail through the material, but I couldn't. The material is already fairly thick in a single layer, but for these shortalls I wanted to be able to wipe them clean on both sides, since with the leather and the buckles washing is less practical.With the construction I decided to recycle the straps from the original fabric version, since I only needed one. I cut a short piece off the strap that runs from the bottom up the back, since there was a bit much spare, and I was not expecting anybody wearing it that was substantially taller than me.
I used rivets again to connect the straps (bronze ones this time), and also on the sides of the waist belt. Again I sewed a tunnel for the belt, to keep it nicely in place and prevent the fabric from bunching up. For the rest I just used fabric glue to do seams and glue both layers together. (The rivets are already keeping the layers together on the edges, and for the middle the glue is strong enough to merge both layers.)
I am very pleased with the end result, in sturdiness, inescapability and comfort. The high bib also works well for eating messy stuff, and can easily be wiped clean.
For cross-dressers and such, it is easy to pull the male organ backward between the legs with the bottom flap, so the bulge mostly disappears, and the material is sticky enough to keep it there.
For the straps in the back I figured out that I could attach the strap up the back to the buckle of the waist belt, by sticking the belt pin through a hole, so the belt can no longer move up and down:
At my 2016 photoshoot with Ariel, I used these shortalls on her in the scenario Retarded.
Webbing Harness
In 2020 I constructed my own harness out of nylon webbing, mostly based on the design of Elaine's Harnesses, but with a number of my own modifications.At my 2020 photoshoot with Zara, I used this harness, combined with her rain overalls, in the shoot In rainsuit and harness.
Even though I made this as a first attempt, several people inquired about details of the harness, and seemed interested in constructing their own version. So I will describe what I used, why and how, but keep in mind it can probably still be substantially improved. Where I have already considered improvements I will mention them. But in the end the harness works already pretty well for me.
The ingredients
Here I list what I have used as materials for the harness, and some tips on handling the materials and possible alternatives. Because this was a trial version, I just got the cheapest materials from Aliexpress.com. With long (and somewhat uncertain) delivery times and low prices, I ordered about 1.5x to 2x as much as I expected to need, to also have enough to correct mistakes.- just over 7 meter of basic nylon webbing, 25mm wide. I used black, but there are many different colors available. For a next version I might consider cotton webbing since it is a bit thicker and friendlier on skin. Note that when my cheap webbing got wet, the water turned black and a bit oily. But after drying it was not visibly different than before.
Note that with nylon webbing, you need to always sear the ends to prevent unraveling; just a quick swipe along a bare flame, but have a bowl of water ready in case it catches fire. - 32 rivets - choose wide heads (e.g. 8-10mm) and short stems (e.g. 6mm). Double cap rivets look nice on both sides. I chose black to match the webbing, but they are also available in silver, copper and bronze. I used cheap ones for this trial version, and had to do a number of them again, either because they bent while closing them, or they just not take well enough and I could pull them apart, or because I made a mistake when assembling. So I would advice getting 100. If you don't have them yet, you probably want a rivet kit as well, with 2 malls that you use to hammer them closed without deforming the caps. A hole punch was not needed with the nylon webbing I used; you can just wiggle the stalk though, or pry a hole with a nail.
- 4 screw rivets (also called chicago rivets I understand). Again in (gunmetal) black, with wide head and short stem (9mm resp. 5mm).
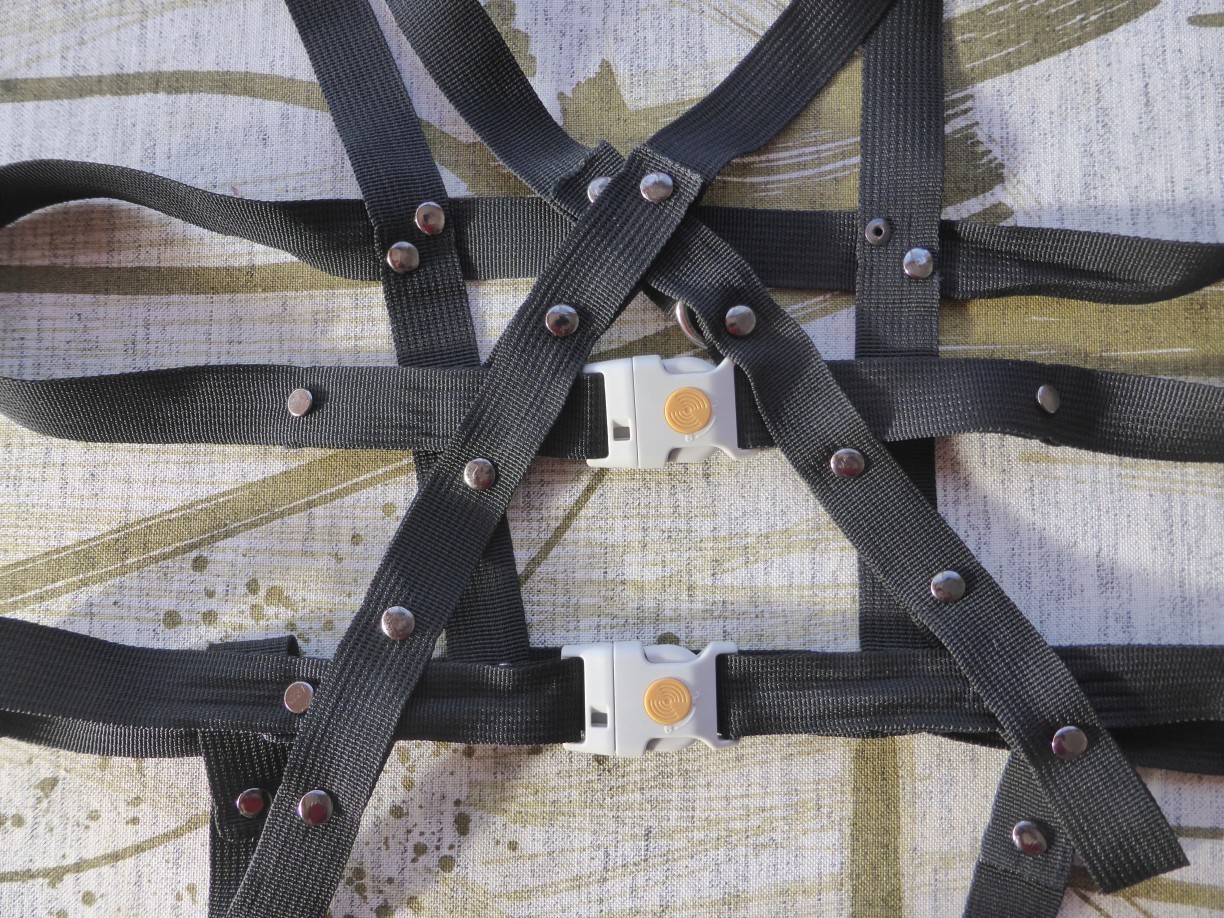
- 2 magnetic locking buckles. See my strap fastenings page for details (at the bottom). You could also use key-locking buckles (actually the magnetic ones took a while to arrive, so I first used those, as you can see in some of the pictures), but those are not very safe since I can open those by hand (although perhaps not in the middle of my back).
- 4 D-rings, 25mm wide. One front, one back, and 2 at the waist band sides.
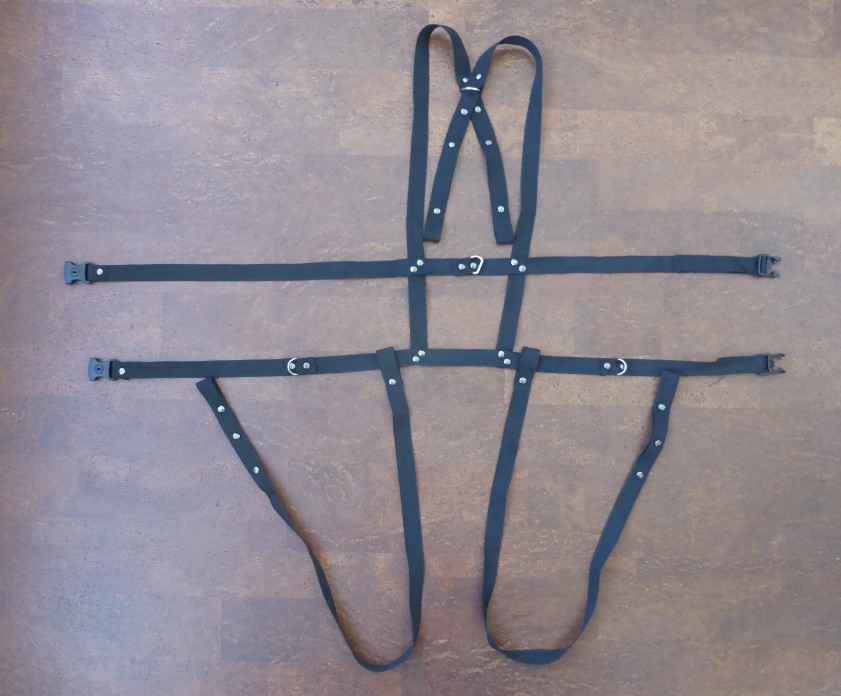
The construction
I am 1.82m and 82kg, and the measurements I give here are suitable for me. Of course you probably need to make some adjustments for your own size and needs, like if you want to be able to wear it over a winter coat or snowsuit.I started with making a prototype from strips of garbage bags, taping them together. This way I could figure out the required strap lengths, and test if the construction would work. It would probably be wise to do that too, especially if you have different size or needs. But all straps are adjustable (when not worn), so there is some leeway. (Actually enough so that even when based om my measurements, it would still work on Zara, who is a foot shorter, but only because she was wearing a thick rainsuit.)
Once I was certain the prototype was OK, I cut the webbing at the required lengths. I will list separately the length of the strap as it is in the harness, the length of doubled-up strap at both ends, and the total length. So for example a shoulder strap is 87cm long from the waist strap front to back, is not doubled in front, but is 27cm doubled up the back (to make 4 loops), so I cut a total length of 114cm.
| Type | # needed | Length in use (cm) | Doubled on side 1 (cm) | Doubled on side 2 (cm) | Total length |
|---|---|---|---|---|---|
| Shoulder straps | 2 | 87 | 27 | 0 | 114 |
| Chest strap | 1 | 94 | 10 | 10 | 118 |
| Waist strap | 1 | 88 | 10 | 10 | 106 |
| Crotch straps | 2 | 100 | 17 | 6 | 123 |
Please read the whole paragraph before doing it yourself: there are a few steps not quite in chronological order. And the pictures of the completed harness are at the bottom: look at them to get a better idea of what I here try to put into words.
Then I started riveting the straps together. The shoulder straps I riveted to the middle of the waist strap, with 10cm in between, with the end of the shoulder straps at bottom of the waist strap. (So no doubling up there.) Next I riveted the shoulder straps to the chest strap, this time 13 cm apart, so that the straps taper a bit apart toward the top of the shoulders. The distance between the 2 horizontal straps is 11cm. The other end I doubled up 27cm, and connected both sides with 5 equally spaced rivets (so about 5 cm apart). This created 5 separate loops that you can weave the waist and chest strap ends through at different heights. I passed one shoulder strap through the top loop of the other, so that they cross. I also added one D-ring for a leash though the top loop of one of the straps, and by having the strap go through the D-ring, you are not relying on the rivets to cope with hard pulling. (For a next version I would do this consistently with all D-rings, and only add a short piece of webbing at the inside to keep them in the right place.)
At the other end of the chest and waist straps I put the locking buckles through, and doubled the strap up far enough to make it the right length. Then I put screw rivets through to fix the ends in place. I chose this construction so that the harness width is adjustable (not only for more than one person, but also for different thickness of clothing underneath.) when not worn, but with the screw part on the inside, it is not adjustable when worn. (With the regular sliders, like with Elaine's harness, the wearer can widen the straps and possibly slip out.)
Then I added one D-ring to the middle of the chest strap (i.e. in front) for a leash by taking a short length of webbing (5cm) and riveting it to the chest strap on both sides of the D-ring. In the same way I added a D-ring to either side of the waist strap (for attachment of reins / to e.g. a chair / to connect wrist straps to).
For the removable crotch straps I doubled one end by 6cm and riveted the end to make a loop where the chest strap fits through. The other ends I doubled up by 15cm, and connected both sides with 3 equally spaced rivets (like with the shoulder straps) to make 3 possible loops for the other side of the waist strap. That way you have 3 different settings for the tightness of the crotch straps, but once you choose a setting and close the waist strap, it cannot be adjusted until that buckle is unlocked again.
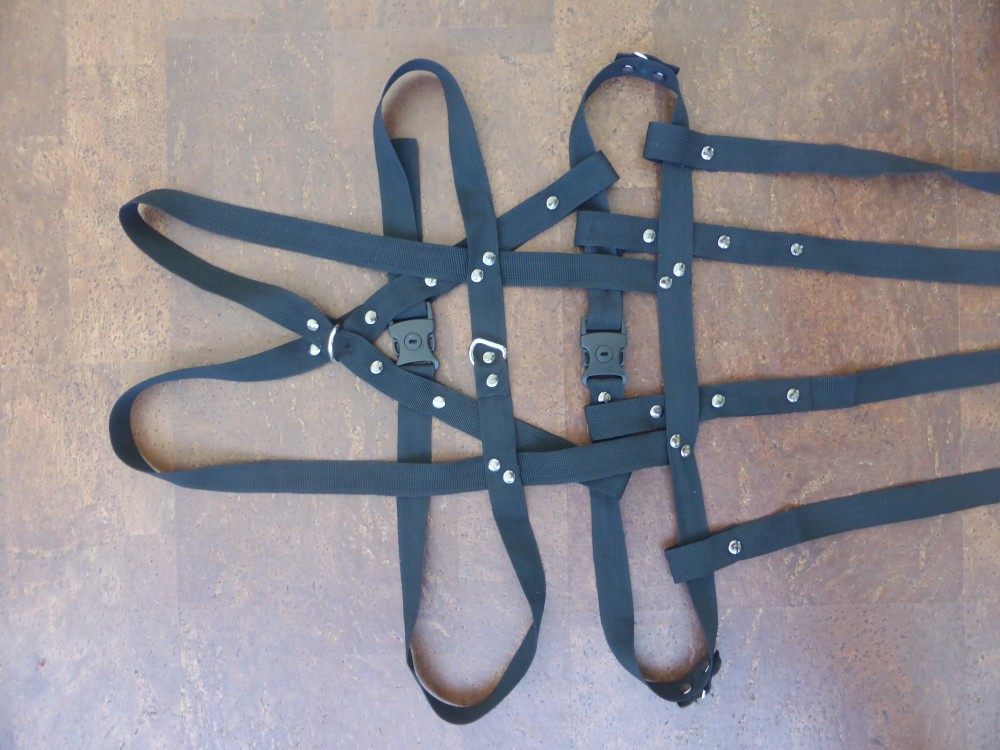
The end result looks like this:
Putting it on
First put the big loop made by the shoulder straps and the chest strap over the wearer's head, with the shoulder strap cross at the back. Then weave both ends of the chest strap through the top (or second from the top) loops of the shoulder strap ends at the back, and close the buckle.If the crotch straps are required, put the waist strap through the single loops at the ends and slide them all the way to the front, right next to where the shoulder straps are riveted. Then weave the waist strap ends through the bottom (or second from the bottom) loops of the shoulder straps. Then put the ends of the waist strap through the other ends of the crotch straps and close the buckle.
Note that the harness can just as well be worn front-to-back; I just prefer to have the buckles in the back: harder to reach for the wearer. Also the extra parts of the shortened shoulder and/or crotch straps are not as visible then. It is a good option if you are on your own though.
 (front)
 (back)
If you have questions, hints, and especially if you have used this page to make your own overalls, harness or other construction, please let me know.